Thursday, January 26, 2023

Marine Mechanical Fish


Hello There

It is my turn to share an arty creation  for Dusty Attic
 and my second for this month.

I love shadow boxes projects and gave this one a vintage steampunk ocean theme Using the Marine Mechanical Chippy! 


I have used a wooden painting panel to collage on, but instead of working on the 
flat front surface I have turned it around and I have used the back,
 this gave me a nice sized shadow box and the wooden panel is nice and firm to work on unlike a stretched canvas.
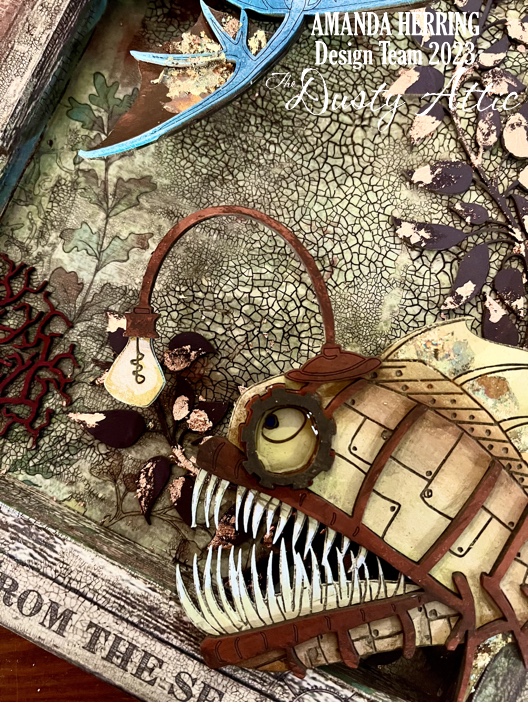


To start, 
I have covered the base with Stamperia scrapbooking paper cutting strips to cover all sides 
of the frame as well as the base, 
I have used Mixed media glue to stick everything down and also applied two coats of the glue on top to seal the surface before adding crackle medium and colour.


Once dry I have added Clear crackle paste with a palette knife and left it overnight to dry naturally and then coloured using Vintage Antiquing paste also from Stamperia
 as this really helped to age the colours in the paper background
 as well as emphasise the crackle finish.


I have used acrylic paints on the mechanical fish chipboard pieces and the leaf branch. In used various different brands of paints including Sennelier, Dina Wakley and Paper Artsy. 


I used PVA glue to glue the fish and coral to the panel, building under the fish up with chippy scraps so that they are nice and stable.
I have added leafing flakes to the fish and Leafy frond  and Glossy accent to the eyes to finish off.


Supplies Used:
DA3365 Marine Mechanical Fish Large 
DA3356 Marine Mechanical Angler Fish Large 
DA058 Leafy Stem
DA1907 Coral #2

Stamperia Clear Crackle paste 
Stamperia Mechanical Seaworld Paper 
Stamperia Mix Media Glue
Stamperia Antiquing Paste 
Zig 2Way Glue 
Leafing Flake 

Acrylic Paint:
Sennelier Turquoise #341 and Raw Umber #205
Dina Wakley Syrup, Sedona, Ocean , Cheddar
Paper Artsy Baltic Blue ,  Squid Ink


Thanks for stopping by to see my latest project 

Until Next time 

Mandy x


Wednesday, January 11, 2023

Altered Mannequin for Dusty Attic


Hello 2023

I hope that we all have a fantastic year ahead 

filled with the things that give us joy and happiness. 


I am super excited to be creating again and back to doing mixed media again! 

What is even more exciting is to be a part of the Dusty Attic 2023 creative team!


I am looking forward to a creative year ahead filled with so many ideas and projects.

Today I would like to share with you an altered mannequin, This mini dress-form was used  to display 
jewellery and is a great size for an altered project. 


I had this old display mannequin that I have wanted to give a mixed media makeover 
To for ages, I decided that an industrial look would give a great contrast to the form. 

I have started by covering the entire surface with a layer of gesso and  pieces of textured tissue paper, the crackle stencil detail in gold were also done using a stencil, tissue paper and gold crackle paste. I have used the stencil to add gold crackle paste onto the loose tissue paper sheets  so that I
can collage this onto the mannequin, 
as there were no flat surfaces making stencilling really difficult on the curves on dressmakers form.


After collaging the tissue papers onto the form I have then added layers of pre painted cogs around the form until I was happy with the effect.


I have then given them a patina and distressed look by adding various colours of gold and a vintage light blue to give them some texture and a worn look,
as well as helping to show up all the layers of texture.
Final touches are done with gold and turquoise patina waxes and some extra gold paint and some red
acrylic for the Industrial Heart for an added colour pop.


The skirt has been made with fabric strips that are stained with a aqua colour spray in dark brown 
and stitched in small bunches around the base of the dressmakers form.
I liked how this added a softer contrast to the cogs and gave an illusion of a skirt around the base.

To finish I have added wings cast from a Prima Imaginarium mould using stamperia extra light soft clay.

I have added some random flowers in gold, red and a soft vintage blue to finish.

Supplies Used:

Dusty Attic Chipboard
Mini Cogs #2 DA1932L
Mini Cogs #3 DA3364U
Cogs and Gears DA1977
Industrial Gears DA2859
Industrial Hearts DA1953

Tim Holtz Idea-Ology collage paper Typeset / composer

Stamperia Crackle Paste Gold
Allegro Acrylic paint-Avorio (cream), titanium white and super gold
Aqua color spray - Leather
Extra Fort Glue
Extra light Soft clay ( wings)

Liquitex Matte Medium
Liquitex Gesso
Paper Artsy Fresco Finish paint - Seaglass
Prima
Imaginarium moulds - Amun and bast
art academy wax Old white, patina green, green brocade opal magic, Gold and aged Brass.

Thanks for stopping by 

I will see you for my next project 

Until Next Time 

Mandy x