Saturday, December 25, 2021

Merry Christmas From Down Under


Hello Crafty Friends

Happy Christmas to you all, and thanks for stopping by.

It's my day to share a project and as it's Christmas Day and super hot here,

 I thought I would share a card that says all that!


I have coloured the background panel with Copic markers
 leaving white space at the top of the card to stencil in my clouds. 
I have used Distress oxide ink and a blending brush for the clouds 


after colouring the water and sand I have used a white posca paint pen, dotting in the space where 
the sea and sand meet to look like waves, this helps to "join" the area where these two colours meet.


I have coloured Santa in with Prismacolor Pencils and used the matching die to cut him out.


Supplies Used:

20715 Summer Santa Stamp Set

20716 Summer Santa Die Set


Copic Markers:

B99  B18  B16  B05  BO2  BG53

E33  E31  E30

Prismacolor Pencils:

PC931 PC925  PC924  PC922

PC1031 PC1001  PC997  PC927

PC1067  PC1054  PC1051  PC1050


Thanks for stopping by to see my latest DT card

I hope you have a wonderful holiday season

Stay safe and I hope we all

have a fantastic 2022.


Until next time 


Mandy x

Tuesday, December 14, 2021

Little Bunny Girl Christmas Card


Hello

I am back with my second project for December for 

Paper Rose Studio.

The card that I am sharing is not your traditional Christmas card but with the right

sentiment almost any stamp can 

make a great alternative Christmas Card.


My Image has been stamped onto pastel paper and coloured with Prismacolor Pencils.
I have then fussy cut out the image.
The background Die has beed raised up by attaching it to the stitched frame die cut 
and using foam tape to set both in place.
This gives some depth to the card base and pops the stamped image.


I have cut out the Merry Christmas in black card and added liquid sparkle
for some interest on the bolder block letters.


Supplies Used:

23365 Little Bunny Girl stamp

16679 Stitched Rectangle Frames Die

21063 Chloe's Coverplate layer  2 Die

22159 Merry Christmas everyone Sentiment Die


Thanks for dropping by to look at my card.

i have another project to share on Christmas day 

see you then!


Mandy x


Saturday, December 4, 2021

The Most Wonderful Time Of The Year


Hi there


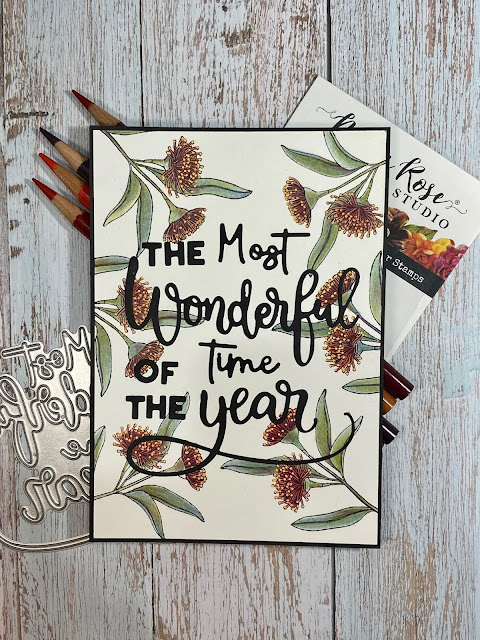
Today I am posting my first card for December and I have made an

Australian Christmas card featuring the small Flowering Gum stamp 

from Paper Rose studio.


I Love the flowering gum stamps from Paper Rose Studio and have used the small 
Flowering Gum stamp for this card.


I have stamped this little stamp around the edges of my card. 
Creating a loose border effect.

I have then coloured with Prismacolor pencils.


I have used a yellow acrylic paint pen to add little pollen dots around the 

edges of the gum flowers


I have then added a simple sentiment using the Most Wonderful Time Of The Year 
die cut out in black card stock.


Supplies used: 

23320 Flowering Gum Small Stamp

22165 The Most Wonderful Time Of The Year die


Prismacolor Pencils:

Mineral Orange

Permanent Red

Crimson Red

Crimson Lake

Black Cherry


Thanks for stopping by

see you next time when I share my next project 


Mandy x


Thursday, November 25, 2021

Three Wise Men


Hi there 

I am back with my third project for November

and Paper Rose Studio.

 As we are heading towards Christmas at great speed I thought i would share  another 

Christmas card, 

this one has ended up  bright and colourful.


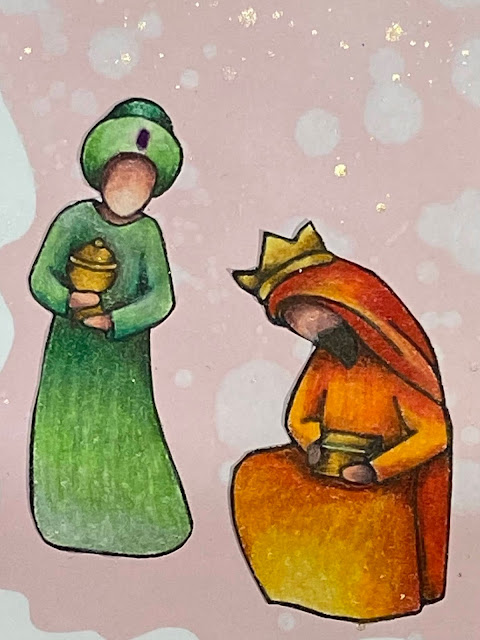
To create the card base I have blended Distress Oxide Ink in Spun Sugar masking off 
the background with a stencil to create an irregular shaped colour block as my base.


The background has also been distressed with water and splatters of gold paint.


The three wise men are coloured with Prismacolor pencils.
 I have fussy cut them and arranged them 
on the card base.


I kept the card really simple and clean as the colours looked so cheerful and

bright together.


Supplies used:

23818 Three Wise Men Stamp Set

18225 Christmas Sentiments 4 x 6 Stamp set


Prismacolor Pencils

Distress Oxide Spun Sugar

Blending Brush


I am loving the new stamps and dies that have been released lately,

I hope you liked this project and are able to find some creative time in your day.


Until next Time 


Mandy x

Sunday, November 14, 2021

Holy Family Christmas Card


Hi again


I have another card to share with you.

I have used Prismacolor pencils to colour my stamped images.


These beautiful Christmas stamps are from Paper Rose Studio.


For my background I have used my scan n cut to cut out a mask for

 my background.

I have used distress oxide ink in Speckled egg to fill in colour. I have also splattered the background with gold paint whilst the mask is still in place.


After colouring in my stamped images I have fussy cut them out 

and layered them up to create my nativity scene. 

My stamped out sentiment has been cut out with the Scan n Cut 

and I have added some tiny gold stars to finish,


supplies used:

23815 Holy Family Clear stamp

23812 Stable Clear Stamp

18335 Christmas Sentiments Stamp


Distress oxide Ink - Speckled Egg


Thursday, November 4, 2021

Flowering Gum Christmas Card


Hi There 

I am so shocked that it's November already! 

 For today's project I have made a very Australian

Christmas card using the Paper Rose Studio Flowering Gum stamp.

I will share a few more Christmas cards as it will be there before we know it.


I have kept  the card really simple as I feel the Gum leaves and flowers
 are the main feature here.
I have used Prismacolor pencils to colour the stamped image.

When doing such intense pencil blending I prefer to use Mi-Tientes 
pastel paper as a base, it has a lot of tooth and grabs the waxy pigment of the
Prismacolor pencils really well.


After stamping the image I have built up the pigment slowly adding layer after layer of pencil until
the textured surface of this paper has filled out. This can take awhile and sometime you need to use a blending pencil ( clear wax) or a light coloured pencil to blend the layers together.


To complete the card I have used a yellow Posca paint pen to add the flecks of 

pollen on the tips of the gum flowers.

I have also used the Merry Christmas everyone die cut from black card 

for a simple sentiment. 


Supplies used: 

23152 flowering Gum stamp

22150 Merry Christmas Everyone Die


Prismacolor pencils 


Thanks for stopping by to have a look at my project


see you next time


Mandy x

Monday, October 25, 2021

Home Sweet Home


Hello  again

I have a card to share with you featuring houses from the 

Slimline Buildings Die from Paper Rose Studio


I wanted to make a house warming card with a modern and colourful feel with 
cheerful and bright colours.

to make the card I have cut the buildings out in a light weight cardboard, 
I use old cereal boxes to do this
 as they are easily available and just the right weight.

I have used an assortment of WOW embossing powders to heat emboss each building.
I have embossed up to 3 layers with some colours to get good colour coverage.


I have stamped out leaves and berries and watercolored them to create a wreath of colour and
a background for my outlined lettering. 


to complete the card I have double matted my base layer onto green and white card.


Supplies Used:

20883 Slimline buildings Die

20880 Slimline Strips

20868 Nesting Slimline Rectangles

17805 Doodle Flowers Stamp Set

17806 Doodle flowers Die Set

20162 So Extra Supporting Sentiments

19619 Outline Alphabet Die Set


WOW Embossing  Powders: 

Love Is The Drug

Angel Eyes

Eggplant

Rose Glintz

Mint Macaroon

Sea Turtle


Thanks for stopping by 

Have a great Day.


Mandy x


Sunday, October 10, 2021

Daisy Days Birthday Wishes


Hi there


Todays card has a really bright colour combination of

orange, pink and green.


I have used two of the daisies from the Dais Days stamp set from 

Paper Rose Studio.


The daisies have been stamped onto blending card using Memento ink in Tuxedo black

as this is a alcohol marker friendly ink .

Once coloured I have cut out the daisies using my Scan n Cut

 leaving a small white border around each one.


The background has been created  using the wonky waves stencil and Pink ink blended with a Coffee coloured brown ink.
In this instance I have used Lavinia Stamps Elements ink in Mulberry and Truffle.

I have die cut the leaf sprig from green card 

 and arranged them around the daisies and the

 die cut layered sentiment word die.


Supplies used:

18490 Daisy Days 4 x 4 stamp set

19130 Wonky Waves 6 x 6 stencil

21102 Little Foliage 2 Metal Die

18297 Birthday Layered Word Die

19023 Black & White Sentiment Sheets


Copic Markers 

E49  E18  YR27

E37 E15  YR07  YR02  YR00


Thanks for stopping by and spending some 

time with me! 

I hope you find time to create today  


Until next time 

Mandy x


Monday, October 4, 2021

Lined Leaf card


Hello again,

well we are now in October and isn't that just a bit crazy.

It's my day to share a card with you for 

Paper Rose Studio.


I Think that this card is a bit different from my usual style and a bit fun as the background is the star with a subtle detail in the skeleton leaves and the sentiment.


The background has been made by using two colours of ink
 and a blending brushthrough a stencil.

I have used a teal blue and a dark grey ink blended together 
to create this smokey look.

I have also backed my leaves and sentiment with vellum to soften the lines.


Supplies Used: 

Paper Rose Studio:

18685 Lined Leaf Outline Die Set

16951 Hello Layered Word die

19124  Small Drops 6 x 6 Stencil

19023 Black and White Sentiments Pack 

Blending Brush


Elements Ink Pads;

Mermaid 

Graphite

Thanks for stopping by 


Until Next Time 


Mandyx

Saturday, September 25, 2021

Kangaroo Paw Thank You Card for Paper Rose Studio


Hello Crafty Friends 


Today I am sharing my latest card for Paper Rose Studio.


I think this card is quite different from my usual style, but I wanted to create 

a spring like feeling with all the layers wildflowers.


I have coloured the kangaroo paws in with Prismacolor pencils 
I have then used the corresponding dies
to cut them out.


It's hard to see but the base of the card has an embossed base of deli paper (unbleached)
that has been embossed using the baby blue embossing folder.
I have then cut out the Sentiment circle die cut in half
to create the front panel that holds all the wildflowers in place.

my sentiment has been layered and added last.


supplies used: 

18617 Kangaroo Paw Clear Stamp

18618 Kangaroo Paw Metal Die

17472 Thank You Layered word Die

18366 Sentiment Circle die

20384 Baby Blue embossing folder

18078 Baby Blue MediumDie

18569 Wildflower 6 Die

18566 Wildflower 5 Die

18563 Wildflower 4 Die

 18557 Wildflower 2 Die


Prismacolor pencils 

jasmine, zest of lime, spring green, moss green

cadmium orange hue, poppy red, crimson lake, dark purple, black cherry

warm gray 90%


thanks for stopping by 


until next time 


Mandy x


Tuesday, September 14, 2021

Paper Rose Studio Peonies


Hi There

I have another project for you.

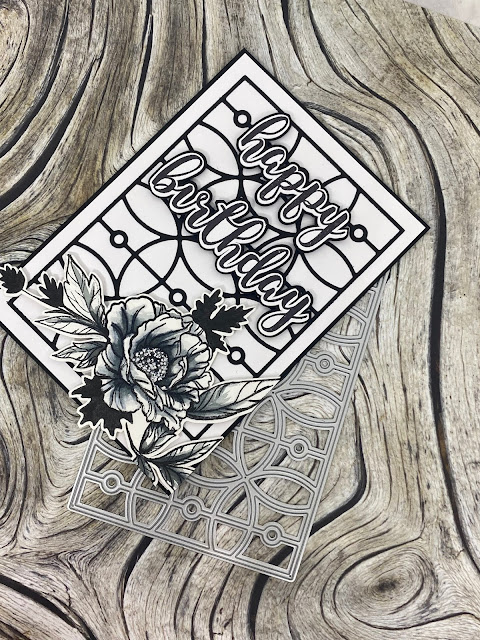
I have used very clean strong lines for this card so I decided to keep everything
very monochromatic and used grey and black tones.


I have stamped out my leaves and flowers onto watercolour paper. I used a masking technique 
allowing me to create a cluster of leaves and flowers.
By doing this I couldn't use my co-ordinating die to cut out my stamped image.
After stamping and watercoloring I used my Scan n Cut to cut the image out with a small white border.


I have also stamped out the happy birthday and cut that out with the Scan n Cut 
as well as a shadow in black card.


Supplies Used: 

17148- Peonies 4 x 6 stamp set

18623 - lots Of Leaves Clear Stamp

18620 - Leaf & Element Builder Stamp Set

21060 - Chloe's Coverplate Layer 1 metal Die

17901 - Sentiments 1 4 x 6 Stamp set

Karin watercolour brush pens in grey tones


Thanks for stopping by 


Until next time


Mandy x


Saturday, September 4, 2021

Hugs, More Blossoms


Hello There 


Welcome to Spring in the southern hemisphere! 

I am really looking forward to the warmer months!


Today I thought I would 

share a card that reminds us of the blossoms 

that this time of year is known for.


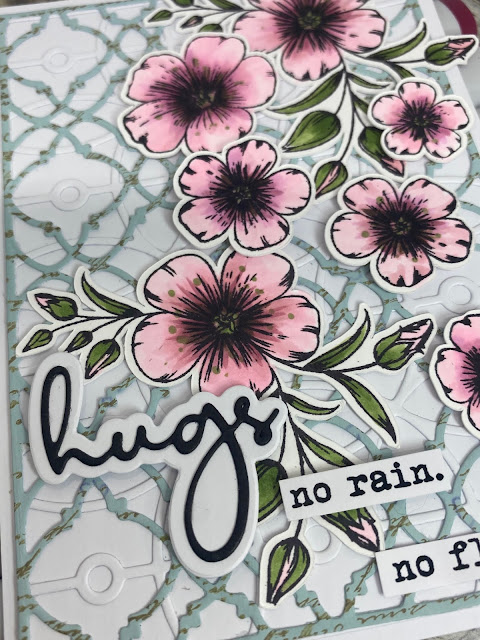
I have layered 2 card base dies to create the background for my card.
The top layer has been painted and stamped with a text stamp for added contrast.


    I have stamped my flowers in memento Tuxedo Black ink and coloured  with Copic markers.


Flowers are coloured in soft pinks from the RV colour series.


Supplies Used: 

21060 Chloe's Coverplate Layer 1 Die

21063 Chloe's Coverplate  Layer 2 Die

17613 More Flowers stamp set

19703  Hugs Fine Script layered word die

19432 Uplifting Type A5 Paper Collection 

16295 Vintage Letter Stamp


Thanks so much for stopping by 


Until next time 

Mandy xxx

Wednesday, August 25, 2021

Lots Of Leaves


Hi there 


I am back to share another card for Paper Rose Studio


My card today features leaves from the Lots Of Leaves stamp set that have

been coloured with Copic markers

and die cut out to create delicate sprigs of green.


I love contrast and white space on cards and I have given the card background some interest with
the Amberley  Floral Square die cut out in Neenah Solar White card.
The texture shows up even with the white on white layers.


My sentiments are from the Fine Script layered word dies cut out in Solar White card as well and layered onto their shadow die cut from black card.


I have finished with a sentiment cut out from the

 Black & White Sentiment pack.


Supplies used: 


18623 Lots Of Leaves Stamp

18624 Lots Of Leaves Die

18524 Amberley Floral Square Die

18846 Nesting Label 2 Die

19679 Wonderful Fine Script Word Die

19688 You're Fine Script Word Die

19023 Black & White Sentiment Pack


Copic Colours:

    G21  G94  G99

YG03  YG63  YG67  


Thanks for stopping by 


see you next time 


Mandy x

Sunday, August 15, 2021

Bloom Wildly


Hello


I am back with my second project for August.

I love silhouetted flowers and the Wildflowers Stamp From

Paper Rose Studio is so gorgeous stamped onto soft blended background.


This is a very simple card but is effective with the dark silhouetted wild flowers 

on a blue blended background.


To create my card I have cut out the slimline card creator base die out twice,

keeping three of the circles aside to colour.

I have used distress oxides in Speckled Egg, Salvaged Patina and Cracked Pistachio to

colour the circles all blended using my blending brush.

I have then stamped my wildflowers randomly on the circles in black versafine ink.


When assembling the card

 I have stacked two of the slimline card creator bases onto of each other 

for added dimension and added words from the Wildflowers stamp set 

and bestie die cut word to finish.


Supplies Used:


18500 Wildflowers Stamp Set

20874 Slimline Card Creator 2 Circles

20868 Nesting Slimline Rectangles

19691 Bestie Fine Script Layered Word Die


Distress Oxide Inks: 

Speckled Egg 

Salvaged Patina 

Cracked Pistachio

18454 Blending Brush 


Thanks for stopping by

Until Next Time


Mandy x

Wednesday, August 4, 2021

Lovely Florals Magnolias from Paper Rose Studio


Hello Crafty friends

I have a new project to share.

This card features the Lovely florals Magnolias stamp set from

Paper Rose Studio.


I have Stamped and Copic coloured my Magnolias on blending card.
Then die cut them out.


 For the circles I have cut out random sizes out of Neenah card,
 using my blending brush and Distress Oxide inks in Abandoned Coral, Ripe Persimmon and Kitsch Flamingo created a smooth gradient from light to dark.


To finish off the card I have added a sentiment and word die cut in black.


Supplies Used:

18186 Lovely Florals Magnolia Stamp set

18187 Lovely Florals Magnolia Die set

16685 Stitched Square Frames

16874 Happy Birthday Large Word Die

19023 Black and White Sentiment Sheets


Copic colours:

W3  W1  W0

Y11  Y23

R00 R01  E71  E74


Distress Oxides:

Abandoned Coral

Ripe Persimmon 

Kitsch Flamingo


Thanks again for stopping by


Until Next Time


Mandy x


Sunday, July 25, 2021

Sketchy Handpicked Bouquet


Hello there 

I have had an amazing four days at an art retreat 

with the most amazing ladies,

and as a result I am posting a bit later in the day than normal


Today my card features the gorgeous Hand Picked Floral Bouquet stamp from

Paper Rose Studio.


As with previous cards I have used  Copic markers to colour my vase of flowers and 
layered that onto embossed textured background


I love clean and simple images on a white background. 

The yellow flowers really pop on the white.


I have used copic colours that look like copper to colour in the vase.

these colours were 

E33  E35  E37  E08

W5  YG95


Supplies Used:

19078 Sketchy Handpicked Bouquet Stamp

21480 Wood Panels Embossing Folder

19023 Black and White Sentiments Sheet


Thanks for stopping by 


Until next time 


Mandy

Wednesday, July 14, 2021

Thanks a Bunch


Hello 


It's my turn today to share another card for Paper Rose Studio


Today I have made another flower card using the thanks a bunch stamp set.

I love clean and simple cards and this stamp set is one of my favourites. 


I have stamped out my image onto blending card with Memento ink
in Tuxedo black

And then coloured with Copic Markers.


I have die cut the coloured image out and layered that onto a white embossed 
background.

A simple sentiment in bold black finishes off my card nicely.


Supplies used:

18075 Thanks a bunch stamp set

18076 Thanks a bunch die 

21477 Sweet Vines 3D Embossing Folder

19023 Black & White Sentiment Sheets 


Thanks for stopping by 

Until next Time 


Mandy x